Showing posts with label Christmas Cookies. Show all posts

Friday, December 7, 2012

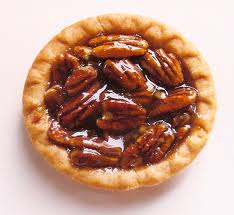
Don't Get Tart with Me! Alma's Miniature Pecan Pies©

For some reason I associate Pecans with the holidays. I'm not sure why that is. Perhaps because when I was a little girl Santa always left whole nuts (Hazelnuts, Walnuts, Brazil Nuts, Almonds, and Pecans) in our Stockings, and Pecans were my favorite. Maybe it is because when I held those Pecans I liked feeling the smooth texture of their shells. Or it could be that as I grew older and Thanksgiving time drew near, I anticipated the Pecan Pie more than the Pumpkin Pie. And once I started doing my own holiday baking, I found that I preferred the flavor of Pecans in my recipes over any other nut. Granted, some recipes just don't taste right without Walnuts or Hazelnuts; and I love eating Walnuts, Almonds, and Cashews, especially whole. But for baking, Pecans win the prize. And since I do more baking during the month of December than any other month of the year, I purchase more Pecans at that time.

The first year I was married, I was introduced to an entire new world of what I classify simply as "Christmas Cookies." I was familiar with the cookies my Mother and Grandmothers made as they rarely varied their selections from year to year. Once in a while my Mother tried a new recipe that she saw in a magazine or was given by a friend. But there was no guarantee that we'd see it again the next year. So when I was invited to do Christmas Cookie baking with my Mother-in-Law (Alma) and her mother (Annie), I jumped at the chance to learn some new recipes. In my opinion, baking Christmas Cookies is one of those comforting activities that really help get you in the Christmas spirit. I always have the Christmas Tree and decorations up by then so before I get started, I make sure the tree is lit and the Christmas Carols are playing.   If I have a fireplace, I start a fire, then turn on the oven, pull out the butter, sugar, flour, and eggs and open my recipe file to begin.  Both Alma and Annie were of pure German descent, so I assumed that the cookies we were going to make were from German recipes. But that was not so. I found that some were English, some American, and there was even one that I recently learned was a popular Danish Christmas Cut-out Cookie. And many of them called for Pecans!
 
Each cookie has its own flavor and attributes, so I can't really say that I have a favorite. I make the ones that my family expects to see from year to year and always throw in a few new ones for variety. If my family really likes the new ones, I'll add them to the list for the following year. I make some that have been in my family for generations, some of Alma's and some that were from Annie's family.   I don't make nearly as many cookies as my Mother made when I was growing up. My family is not as large, and storage is a problem. And I tend to make the ones that are not as labor intensive and yield a good number of cookies rather than the more time-consuming varieties so that we have a nice selection. My Mother did not work outside our home until I was in college, so she had more time to devote to her holiday baking than I do. My Mother also had 8 willing little hands to help her (probably more than she really wanted at times), whereas once my boys reached a certain age, they had no interest in Christmas Cookie baking.  They did, however, like the fact that during December there was almost always something baking when they arrived home from school, and after I started working, while they were doing their homework at the kitchen table in the evening.  When I took a few days' vacation time right before Christmas to finish all the baking, our kitchen looked like a bakery and smelled heavenly. Today both my sons enjoy baking Christmas Cookies, and I have passed my recipes collected from various sources on to them. I know that whether I'm making a recipe that was my Mother's, Alma's or Annie's, I am drawn back to my childhood and young adult years and the times we shared when we gathered together for baking days. I remember my boys in their playpens watching the baking activity in wide-eyed amazement as we produced batch after batch of the delicious treats.  And I long to return to the years when they stood on stools helping me make and decorate their favorite cut-out varieties. Those are an integral part of my Christmas memories and I treasure them.

Today I'm sharing Alma's recipe for Miniature Pecan Pies. I've seen them called Pecan Tarts and Pecan Tassies, but really I think they are all pretty much the same.  The first time I had one of these flaky crusted sweet treats I remember thinking that it was wonderful that the essence of Pecan Pie was captured in a two-bite treat. It was also wonderful that they had fewer calories and were not as sweet as an entire piece of Pecan Pie. When we baked these for the first time in 1972 and for many years thereafter, I never saw anything like them in bakeries, stores or specialty food shops.    I didn't even know anyone who had a similar recipe.  Then in the 1980s they began springing up everywhere. I don't know if those other recipes are similar, because I've never really checked.  I like this recipe because it has a cream cheese crust that makes it flakier than regular pie crust.  I have always used Alma's recipe.  In fact, I have used it so much that the ink has faded on the index card where I wrote the recipe forty years ago this month. And some of the words have smeared from butter and the filling mixture.  It doesn't really matter since I long ago memorized the ingredients. But just in case, I recorded it on my computer so that my Grandchildren will have it even when my memory starts diminishing more than it has already. 
 
I have a few suggestions about your technique for this recipe. First, don't make the crust or shell too thick. You should have no trouble achieving the indicated yield if you stick to a crust that isn't too thick.  If you make the crust too thick, the bottoms will not bake thoroughly in the stated baking time and you will end up with a bottom crust that is soggy and slimy. If you extend the baking time, the tops will become too brown or will burn. 

Second, there is now a kitchen tool available for forming the crust in the miniature muffin tins, whereas for many years I formed them by hand. I purchased my miniature-tart shaper from The Pampered Chef® [www.pamperedchef.com], although I am sure you can find them in other stores that carry baking and pastry utensils (see photo below).  It is an invaluable tool. You can still make them by hand, but you will achieve a more uniform end product and save yourself unnecessary grief, time and elbow grease by using a tool like this. 
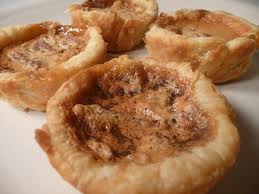
 
My third suggestion is critical for achieving a beautiful little pastry and a perfect tasting miniature pie.  Do NOT mix the filling with a mixer. When you use a mixer (stand, hand or egg-beater) the filling forms tiny air bubbles.  Then, when the filling is poured into the crust, although it may look like it is full, in reality it is mostly air, not filling.  It's sort of the soda pop in a Styrofoam cup effect. There are lots of bubbles at the top of the cup, but not much soda below. The same principle applies here; when you fill the crust with the filling, most of it is only air bubbles.  Then, when you bite into the pastry, there will be a "sinkhole" between the crusty looking top and the actual filling. All those air bubbles pop during the baking process, and the filling shrinks, leaving the crusted foam on the top.  It does not give you the desired result of scrumptious little pecan pies but rather leaves the filling with a gritty taste.  You can see from the photo above how the top is foamy looking and the filling has shrunk.

Fourth, if you seem to be running out of filling before you have filled all the crusts, simply add a little more melted butter, vanilla and dark corn syrup to the remaining filling mixture. You will not be able to tell the difference in the finished miniature pies. 

Finally, there is an art to putting the right amount of filling into each crust. When they are finished baking, you should be able to easily remove each little pie from the tin. If you over fill the crust, the filling will run over and cause the little pie to stick to the tin;  it may even burn.  You will end up digging its crumbling goodness out of the tin with a knife.  Fill the crust to a point just below the rolled top of the crust.   Each pastry should release easily from its cup.  I have never used non-stick cooking spray in the tins, and if the crusts are filled properly you shouldn't have to either.  

These really are a breeze to make if you follow through with my suggestions. And don't think these reserved just for a holiday treat. I make them all year round. They travel well to picnics, potlucks and just about anywhere.  I can guarantee they will be a hit where ever you serve them.  I hope you will give them a try if you've never before made them. I think you will be glad you did. 
 
©2012 The Cook in Me: Don't Get Tart with Me! by Kathy Striggow

Alma's Miniature Pecan Pies

Yield:  24 individual miniature pies
 
Ingredients
For the Crust:
1 cup unsalted Butter, at room temperature
8 ounces Cream Cheese, softened
2¼ cups All-Purpose Flour
   
For the Filling:

3 cups Light Brown Sugar
4 Large Eggs (Make sure they're at least large—today what are marked as large are really medium, and if they're too small you won't yield the right amount of filling)
2 Tbsps. Unsalted Butter, melted
1 tsp. Vanilla Extract
1 Tbsp. Flour
2 cups Pecans, halved (or chopped into rough pieces, your preference)
Confectioners' Sugar for dusting
Directions

For the Dough:
1. Using a stand mixer fitted with a paddle, or an electric hand mixer, cream together the butter and cream cheese.

2. Add the flour and mix on low until all the flour is incorporated.
3. Cover and refrigerate for about an hour or overnight.

4. Preheat the oven to 350° F.


5. Roll the dough into large walnut-sized balls.
6. Place the balls into the miniature muffin cups and working one at a time, press the ball down in the center with a mini-tart shaper. Or, if you don't have one, flatten the ball in the palm of your hand until it is large enough to fit in a muffin cup.

7. Gently press the dough into the muffin cup and either roll the top edge or pinch the top to create a fluted edge.
8. Repeat with the remaining balls.

For the Filling:
1. Mix together the brown sugar, eggs, melted butter, vanilla, flour and pecans. Pour evenly into crusts.

2. Bake for 20 to 25 minutes or until the tops are set.


3. Cool for a few minutes in the muffin cups and then remove to a cooling rack to cool completely.
4. Dust with confectioners' sugar before serving.

5. Store the miniature pies in an airtight container.
©2012 The Cook in Me: Don't Get Tart with Me!  Alma's Miniature Pecan Pies by Kathy Striggow


Tuesday, December 4, 2012

Pecans Roasting on an Open Fire: Thumbprints©

I married into a family that had two amazing cooks. One was my husband's mother, and the other was his maternal grandmother. Because my father-in-law's mother, Nellie, was quite elderly when we started dating, and moved to a nursing home shortly after we married, I never had the opportunity to taste her cooking. One of her legacies to me however, and that I still have to this day, was her 1950 Betty Crocker Picture Cook Book©¹. Of course, the metal center is rusted, the pages are now disintegrating and pulling out of the loose leaf binding, and some of the index pages have disappeared. But I treasure that book and know that I will never throw it away. Written on the pages of the recipes she had made are her handwritten notes: "Ed didn't like," and "needs more salt" or "too much marjoram." I can visualize her in her little ruffled apron jotting down her suggestions for additions or changes to the recipes, and critiques of the dishes she made. Those notes make me smile whenever I see them, and keep her alive in my memories.

Nellie was a small woman. She stood about 5 feet tall with heels on, and she weighed about 95 pounds soaking wet. This always amazed me because the story goes that my father-in-law was a very large baby (over 12 pounds) and that the only way they could weigh him was on a meat scale! We'll never know whether that was a true story or not, but it hurts me just to think about how she got that big baby out of such a small body! She was always immaculately dressed, and regardless of the season, she never went anywhere without wearing a hat and gloves. Not a hat and gloves for the weather but rather fancy, stylish ones. I grew up during the 1950s and 1960s, and it wasn't that common to see women wearing hats and gloves unless they were going to church. My mother never wore a hat or gloves. I remember my sisters and me wearing them only to church on Easter Sunday, but that was about the only time I had the need for a bonnet or a pair of white gloves. Even before I knew who she was, I can recall Nellie standing on the corner of the block where I grew up waiting to take the bus downtown. She was always all dressed up and wore her hat and gloves. This was in an age when it was considered a special occasion to go "downtown," and people dressed up for the trip. These are about the only memories I actually have of Nellie; the rest I learned through stories from my husband and in-laws.

I love that old Betty Crocker Cook Book©. It has old fashioned pictures and "How-to" instructions for beginners. It also has a dictionary of special and foreign terms like, "éclair" and "ravioli;" terms that we don't even think of being foreign words anymore. It was a great book for a beginning cook like I was when I inherited it from Nellie. I considered it my bible for home cooking. I found a lot of recipes in that book that I still make today. I also made a lot of the recipes that she did; many times I would try something just because she had made it. That's probably one of the reasons that the pages started disintegrating. Sadly, one day I noticed that the pages were crumbling in my hands. I began to worry that the cookbook would eventually turn to dust and I wouldn't be able to pass it on to my daughters-in-law or my grandchildren. That was heartbreaking to me. If it disappeared, those constant reminders of Nellie would eventually disappear as well. So I curtailed some of my use of the book, and began copying the recipes onto my computer instead. If I didn't have the actual cookbook, perhaps I could still save the recipes.

But, alas! In the summer of 2003 when my family and I were driving to White Birch Lodge in Elk Rapids, Michigan for our annual pilgrimage to the lake, we stopped at a Cracker Barrel Restaurant in Monroe, Michigan for breakfast. Lo and behold, when I looked through the glass as I approached the entrance, I saw what looked like the same cookbook on display. Could it be? I couldn't get through that door fast enough! Forget about breakfast—there was something more important in that restaurant than food! After I nearly knocked down everyone in front of me, I made it to the display. The book looked exactly the same (well, except that the cover on mine had faded and the binding was falling apart). I picked up the book and held my breath as I opened it. Sure enough, it was a reprint of the first edition of Betty Crocker's Picture Cook Book©²! I can't tell you what I had for breakfast that day. And I can't tell you how the weather was at the lake that week. I can't even tell you whether we took any guests with us that year. But I can tell you that I bought that cookbook and it, together with Nellie's original, shares a place of honor in my kitchen on my cookbook shelves.

One of the recipes from the book that I make at this time every year is Thumbprint Cookies. And as with almost every recipe that I've made over the years, I've altered it from the original version. Not because there was anything wrong with original; it's just that I've adapted it to my own taste. I prefer finely ground pecans mixed into the dough instead of rolling the balls of dough into the nuts before baking. And I add the whole egg to the dough because you don't need to roll the balls in the egg white if you're not going to roll them in the nuts. And I add about ¼ tsp. almond extract to the dough in addition to the vanilla extract. I also prefer filling the 'thumbprint" with tinted Buttercream Icing flavored with almond extract because that is the way I have made them since the first Christmas I was married. These cookies are so simple to make that you might find you'll want to put them on your Christmas Cookie list every year. In fact, I make them in quadruple batches because they're small and they disappear very quickly at our house. Because after all, It just isn't Christmas without Thumbprints!

¹Betty Crocker Picture Cook Book ©1950, General Mills, Inc.


²Betty Crocker Picture Cook Book ©1950, General Mills, Inc., reprinted 1998 by Wiley Publishing, Inc. and General Mills.

© 2012 The Cook in Me: Pecans Roasting on an Open Fire by Kathy Striggow

Thumbprints

Yield:  About 2 dozen 1-1/2 inch cookies             

Ingredients         

For Cookies:

½ cup soft Shortening (half butter)³
¼ cup Brown Sugar
1 Egg
½ tsp. Vanilla Extract
¼ tsp. Almond Extract
1 cup All Purpose Flour
¼ tsp. Salt
¾ cup finely chopped Pecans

For Buttercream Icing:

2 cups sifted Confectioners' Sugar
¼ cup softened Butter
2 Tbsp. Warm Water, more or less
½ tsp. Vanilla Extract
½ tsp. Almond Extract
Red and Green Food Coloring (or other colors of your choice)

Directions

1.     Heat oven to 375° F.
2.     Cream together shortening, butter and brown sugar until light and fluffy.
3.     Mix in egg, vanilla and almond extracts and blend well.
4.     Sift together the flour and salt and stir into the creamed mixture together with the pecans.
5.     Roll the dough into 1" balls. 
6.     Place about 1" apart on ungreased baking sheet. (There is no leavening agent in the dough so the cookies will not spread that much while baking.)
7.     Bake for 5 minutes.  Remove the cookie sheet from the oven.
8.     Quickly press your thumb gently into the top center of each cookie.
9.     Return to the oven and bake for approximately 8 minutes longer. 
10.   Remove from oven onto cooling rack.
11.   When cookies are completely cooled, place a bit of tinted Buttercream Icing into the "thumbprint."

For Buttercream Icing:
 
1.     Blend together the confectioners' sugar and the butter.
2.     Add the extracts and the water and stir until smooth and of the right consistency.
3.     Divide the icing into as many portions as you want to have colors and place in separate bowls.  Add a few drops of the food coloring to each portion to achieve the desired color.
4.     Place about 1 tsp. icing into each cookie's indentation.  Let the cookies set completely before storing them in a tightly sealed container and store in a cool, dry place.
 
³You can use all butter, but chill the dough for appx. 30 minutes before baking.

You may use other fillings for the cookies such as sparkling jelly, jams, candied fruit, or whatever else you like.

© 2012 The Cook in Me:  Pecans Roasting on an Open Fire by Kathy Striggow.


Friday, November 30, 2012

When Do We Start Baking Cookies? Vanillekipferl (Crescents)©

It's that time of year again.  It seems like every year the months get shorter and shorter, and twelve of them fly by in what would have seemed like 5 years when we were children.  I could swear that Christmas¹ was only a few weeks ago, and that we just popped the cork on the Champagne bottle at Midnight on New Year's Eve.  Regardless, I have always loved this time of year that we call the "Holiday Season."  One reason is that it seems people are generally in a more benevolent state of mind, and exhibit more tolerance for others than during other times of the year. Why this doesn't continue all year I don't know.  I enjoy the spiritual aspect of the season and it seems no matter how old I get, there is still something magical about Christmas Eve.  I also love seeing houses decorated with twinkle lights and pine garlands, and the fact that even offices, hospitals and other commercial buildings take the time to decorate for the season.  There are many steps involved in getting ready for the holidays, and therefore I have many topics I could address.  But for today, we're going to discuss some of the preparations that can be made in advance of the actual day that you celebrate.

Decorating for the season is a preparation that takes careful consideration.  Deciding what day to decorate the outside of the house, for those like me who grew up in the Midwest, on the East Coast, or in the Northern States, was always a question that was more difficult than you might expect. You do not want to be outside on a ladder or up on the roof hanging the electric icicles when it is snowing, or when the temperature is below 32° F.  Therefore, it is important to catch that last warm day between the end of Indian Summer and the first snowfall of the year for that task, and predicting that day has become quite a feat.  When I was growing up, it used to be that the first snowfall in Northwest Ohio occurred on November 10th; at least that was the date most often predicted for the first measurable snowfall of the year.  I remember this not because I memorized the Farmer's Almanac every year, or because I am a meteorologist or have a penchant for weather statistics.  I remember it because that day is my sister Janet's Birthday.  Inevitably, we would wake up on Janet's Birthday and there would be snow on the ground.  Sometimes there was just a dusting, and sometimes there were several inches.  But because weather patterns have changed over the past few years due to the global warming phenomenon, over population, destruction of the ozone layer and whatever other reasons experts advance as the reason, predicting that last warm day has become more difficult.

Now, for you folks living in the southern states with those lovely, temperate climates all year round, this may not seem like much of a big deal.  However in my neighborhood, there was an art to getting those decorations up in what was considered an "acceptable" time frame, or you were subject to scorn by your more astute neighbors.  You see, if you put them up too early in the fall, people regarded you as lazy, and assumed that you kept them up all year. If you put them up in a time frame that was regarded as too late, you were considered as lazy, and the question that circulated the neighborhood was, "Why bother to put them up at all?" And believe me, people remembered your decorating habits for as long as you lived in the neighborhood.  ("Remember the year George didn't get his lights up until the week before Christmas and there were already six inches of snow on the ground?  I'll bet he still can't feel anything in those fingers of his that got frostbitten."  Or, "For crying out loud, Ethel, will you look at that?  It's July, and George still has his Christmas lights up! Now he might as well leave them up for the rest of the year!")  Poor George's only escape was to escape to a new neighborhood on the other side of town.

Because I was never responsible for putting up the outside decorations, I never worried too much about this dilemma.  However, I must say that I might have been guilty of prodding my spouse to get the decorations up in a timely manner.  My domain, as you might guess, was the inside preparations.  In addition to decorating, that included getting the holiday baking done.  Just as at the beginning of November, I would subtly suggest that we might want to put the decorations up outside before Thanksgiving, the day after Thanksgiving my husband and children would not-so-subtly ask, "When are you going to start baking Christmas Cookies?" 

At my house, Christmas baking was a pretty big thing, and pretty much limited to cookies. Because I was never much of a Fruitcake fan, the only Fruitcake I ever made was limited to miniature loaves that I gave away as gifts to friends when we were too poor to give anything else.  Even though it was part of my family's holiday tradition, and my Mother and both my Grandmothers made Fruitcakes every year, that tradition never appealed to me once I had a family of own. (FYI:  I am saving the topic of "Fruitcakes" for another day because I do have very specific thoughts about why my Mom continued making it every year, when basically she and my Dad were the only ones to eat it.  And then there was always the question as to why it took Mom for what seemed like forever when she went upstairs to the attic every evening to annoint the Fruitcake with rum, brandy, bourbon, or whatever liquor she was dousing it  with that year.)

Living in a household that was of German, English, Czech, Slovakian and/or Moravian ancestry, we enjoyed a wide range of Christmas Cookies that reflected a smorgasbord of ethnic origins.  Like the Fruitcake, some of the cookies had to be made early in the season to mellow, or soften before they were ready to eat. Those started making shortly after Thanksgiving and stored in the attic..  You may think this seems like a strange place to keep them, but it served several purposes.  First, it got them out of our kitchen, which also served as our dining room, our homework room, and our game room.  The room was not that large, and it didn't have much storage space.  Second, it kept them out of sight, as in "out of sight, out of mind," which is an important concept when you have four growing children, all of whom had friends, all of whom had a "sweet tooth" or two.  I guess Mom thought we'd forget about them if they were up in the attic.  I also guess she forgot that my oldest sister and I shared a bedroom on the second floor across from the attic. Third, it kept the cookies fresh because the attic was the coolest part of the house--it was not heated (in fact, it was darn right freezing in there in the dead of winter if you happened to slip in during the night in your pajamas to grab a . . . never mind).  And finally, when I say we made Christmas Cookies, I mean we made Christmas Cookies.  Without exaggerating, I would easily say we made about twenty different varieties, with at least ten to twelve dozen of each variety. That's a lot of cookies! And where else do you store them in a house that was already bursting at the seams?  This was another reason we always started baking right after Thanksgiving.  If we didn't, we never would have been able to make all the different varieties that we did.  People today don't make Christmas Cookies like they used to.  For one thing, who has time?  For another, today you can purchase cookies that are just as good as the ones your mother or grandmother used to make from bakeries, supermarkets, and ethnic specialty shops.  For me, however, it's one of the traditions that my Children and Grandchildren will always associate with the holidays, and hopefully with me.  And I believe there are some traditions that are worth saving and passing along to my Grandchildren.

I have several varieties of Christmas Cookie recipes that I want to share with you. We're only going to highlight them one at a time, however.  Some are from my Maternal Grandmother; some are from my Paternal Grandmother; others are from my Mom; still others are from my Mother-in-Law and her Mother.  I'm sure I've got something in my Cookie Jar for everyone's taste.  But for today, I am going to share the recipe for the cookie that was the fastest one to disappear at my house, and therefore one of the last ones my Mother made before Christmas.   My sisters and I never helped make these particular cookies because Mom always said the dough was too difficult to handle.  After having become a parent of only two, rather than four children, and after having made this recipe now for many years, I think her reasoning had more to do with the fact that she got more accomplished when we weren't "helping."  We always called these cookies Crescents, and it was not until years later that I learned their real name is VanillekipferlThey are of either German or Austrian origin depending on which story you believe. This tells me that they came to us through the Moravian heritage of my Grandmother Lasak.  The basic recipe is the one my Mother used, and therefore I know that the cookies melt in your mouth. I have made a few adjustments to it, but they are just as good as hers.  I am sure there may be more authentic versions of Vanillekipferl out there. These are not difficult to make.  The German and Austrian recipes call for almonds, hazelnuts or walnuts; but my Mother and Grandmother always made theirs with finely ground pecans.  They are worth trying, at least once.  If you do decide to attempt them, let me know what you think!

¹ I will be using the term "Christmas" throughout this article. When I grew up, people did not consider "political correctness" as the important issue that it is today. But because in my family, Christmas was, and is, the holiday that we celebrate in December, I am using that term.I hope no one is offended by my use of it.

©2012 by Kathy Striggow


MOM'S CRESCENTS

Yield:  About 5 dozen
Ingredients
 
2-1/4 cups All Purpose Flour
3/4 cup Powdered Sugar
3 Egg Yolks
Seeds from 1 Vanilla Bean OR
Pinch Nutmeg
1-1/2 to 2 tsp. Pure Vanilla Extract
Pinch of Salt
1- 1/2 cups Finely Ground Pecans
1 cup Butter, at room temperature
Powdered Sugar, to coat finished cookies
Directions
1.     In a large mixing bowl, beat butter until smooth.
2.     Add the powdered sugar and beat until the sugar is absorbed into the butter.
3.     Add the egg yolks one-at-a-time, mixing between each egg yolk to make sure the butter has absorbed the yolk.
4.     Add the nutmeg, vanilla bean seeds OR vanilla and salt.
5.     Add pecans and flour and mix together until a dough forms.
6.     Leaving the dough in the bowl, refrigerate dough (covered) for 30 minutes.
7.     Preheat oven to 350° F.
8.     Form dough into crescent shaped cookies about 3-in. in length from tip to tip.
9.     Place cookies on greased or parchment-paper-lined cookie sheets, approximately 3/4-inch to 1-inch apart. (There is no leavening agent, so they are not going to spread.)
10.    Bake cookies for 15 minutes or until a light golden brown. Do not over bake!
11.    While cookies are still warm, roll in powdered sugar. If they are too warm, they will fall apart when you're rolling them so be very careful. Roll again in powdered sugar once they have cooled. 
12.    Store in a tightly sealed container in a cool, dry place.